BUILDING the NED 163
Building the boat on my own is an extra big challenge. But luckily I've got a lot of help from friends. They help me where they can and that makes it possible to be finish the boat on time!
To follow the regulations we post photos of our construction process every now and then. The building blog is also found on my facebook page, but more detailed reports are found here:
21-05-2023 BIG DAY!!!! She has felt water!!!
In Hellevoetsluis we launched the boat. Using a crane, we quietly launched her into the water. an emotional moment! Of course she was baptized by Merel and she wished her and the crew a safe voyage.
After launching I motored the boat to Middelharnis to let the rigger put on the mast!
I had to have quite some patience, but the boat is finally ready to sail. Neut Mast in Middelharnis rigged the boat! Very happy with it.I did not want a mast in two parts, so I did not order the standard. I know a mast is just as strong with a good sleeve, but still. If it has to go into a container, I’ll use a good saw😉
19-05 The baby has left the garage
Today a big day! A trailer is rented, and the boat can leave the garage to bring it to the keel manufacturer.
With great help we moved the boat out and with a wheelbased excavator we lifted the boat onto the trailer. And of we go!
The keel is ready to be installed. Weighted lead 138 kg and weighted keel 241 kg in total! It has a beautifull orange coating, seawater proof, non adhesive and smooth!
The keel manufacturer has two cranes and that made it easy to lift and position the boat exactly above the keel. Drilling the holes from the outside inwards was a easy done job. With a sufficient amount of SikaFlex, the keel fitted like a glove! Very happy with it!!!!
Later at home, the final touch with a antifouling in white! Tomorrow big day!!!
5-5 Sails arrived
Two small boxes arrived… Far to small to contain all the sails I think… or… are they folded to the size of a handkerchief? I understand that such small sails as a GC580 has, the boxes do not need o be big… but this is very, very, very small…. I don’t dare to open them… tomorrow new chance…
YEEEEH, two other boxes have arrived!!! Two long boxes…. Luckily I didn’t open the two small boxes yesterday!
After opening the boxes, I’m happy as a child! Even the dog was happy!
Well done Quantum!!!
7-5 Rudder, tiller and bowsprit
Sailing without a rudder is possible, but for the appr. 4000 miles not very convenient. So I started with the rudder and tiller. The rudder has to be enforced with a band of glasfiber 600 gr/m2 10 cm width. I added an extra layer of 600gr/m2 over the entire lower part of the rudder. It makes it extra strong and that's better than saving some weight.
The bowsprit is made of 4 layers of the multiplex 'left overs' and also reinforced with 600gr/m2 glasfiber on both sides.
And after all the work was done, it was time to enjoy the cockpit with a drink! Also the dog was present, although she didn't want to be on the picture...
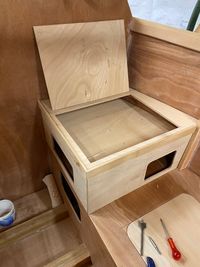
30-4 Deck layout and electricity
The end is near! I started fitting the deck layout. Don told in one of his videos that the EVO foam is a great anti skid material and great to sit on as well. I reached out to the company in the USA where Don bought it but the prices were really high. After a good search on the internet I found a company that is producing the same material but doesn't put on the label 'boating' on it. That saves lots of euros!
Also started with the wiring of the boat. I fitted the VHF and AIS. Fitted the navigation lights (LED) and run the wires for the solarpanel on the back of the boat, the wires for the autopilot (12V) and a wire for an extra worklight on the back of the boat. I've put in the batteries in, a 110Ah 12V household and a 90Ah for the autopilot. The batteries are in a watertight compartment just to be sure.
Also the plugs throught the watertight compartments are fitted and the hatch to the front end.
22/23-4-2023 OPST training
A two day training in Harlingen, organised by the "Zeezeilers van Marken", made me one step closer to sail a safe trip! Very usefull, a bit though and a lot of fun to do! The first day it was all theory about safety and survival techniques, the next day it was a practical day. It is better to show you how it went than telling you :-)
For those who are paying attention, correct! the life vest did not open itself! So great to have experienced that in this environment and not on the ocean!
11-4-2023 Pumps
I've installed all three pumps! Two hand operated pumps and one automatic electric bilge pump. The handpump in the bunkside of the cabine, also will be able to empty the sink by using a three-way valve. The electrical pump has a capacity of 3100 ltr/hr and is automatically operated by a sensor. Each pump has a 25mm hose and a non-return valve. The locations where the hoses pass the waterthight bulkheads, connectors are used.
26-03-2023 Kit and stainless steel
Today we've made great progress! All the stainless steel is bolted on the boat. Not everything was that easy, but with a lot of patience, sticky fingers and the right length of all the bolts, we made it! Off course it took also a lot of Sikaflex to make shure that everything was sealed and waterthight!!! Very happy with it!
25-03-2023 Interview
Great that doing the things you like, might inspire others! Maybe that goal comes near by an interview by one of the better known sailing magazines in The Netherlands. I cannot tell you which magazine, but you'll find out soon. For now it was great to talk about everything what happens when you build a boat, the challenges I've overcome and the challenges to come.
15-03-2023 Sponsoring by Rainbow Management
Proud to announce my sponsor: Rainbow Management!!
Rainbow Management is a consultancy company and founded by Pieter Overtoom and Katarina van der Stad almost ten years ago. Rainbow Management is specialised in contract management, environmental management and tender management. A great company which helps their partners in realising their projects. They can facilitate both constractor as principal.
Years ago I've met Pieter and Katarina and they are real entrepreneurs! Great persons who live their dream and formed a great group of proffesionals around them. It is realy great that they've reached out to help and support me in realising my dream! Thanks!!!

27-02-2023 The Keel is in good shape
What a beauty! The keel is ready, it is produced by a fully certified steel construction company. Great work and a tour around the factory was great!!! The weight of the keel is also spot on! it is 103,5 kg.
The lead is produced in the North of The Netherlands by a specialised company. Also the lead was weighted on a great weight! The both are 64,5 kg
26-02-2023
Every step makes her more beautifull and closer to be sailed!!! Today I've painted the deck with 2 components DD-lak. First I've put on some plastic to minimize the dust coming from the ceiling after all those hours of sanding. I've put on 2,1 Kg of paint in one layer. I probably have to put on an extra layer or two, but we'll see!
For now I'm very exited and proud to have reached this step! It took me 560 hours till now.
25-02-2023 She is light!!!
Today I've made a great effort in weighing my precious! It was quite an effort. There was not enough room between the deck and the ceiling so I've made a construction with a cross beam and a few big lewmar blocks so with a chain hoist it was possible to lift 'The Biggest Monkey' 10 cm. Just enough to take the supports away and let her float in the air.
We first weighted her with the cross beam and slings and she weighted 508,0 Kg. The cross beam and slings weighted 16,5 Kg, so netto it is a weight of 491,5 Kg. I'm very happy with the weight. She is correctly on her BMI :-)
12-02-2023 Jewelry fitting
Last weeks I’ve made good progress with ‘The Biggest Monkey”! almost ready to start the final paint job. That will transform her into the real beauty!https://strato-editor.com/.cm4all/widgetres.php/com.cm4all.wdn.PhotoGrid/images/thumbnail-grid.svg
This weekend I started with all her jewelry. The stainless steel parts prefitted to make sure the boat will be not only be a beauty, but also equipped with all safety parts needed. All handrails, railing posts and bow and stern railing, needed to keep me safe on board is fitted. Especially determining the correct locations of all the drilling holes for the railingposts was very difficult. The two different angles made an easy fit impossible. Luckily the ‘magic eye’ of a good friend of mine made it successful.
04-02-2023 White represents 'clean'
To be honest… I’m not the best in a clean desk policy, I’m not always good at storing all stuff behind me, last but not least I’m horrible in cleaning…
The solution is: a white interior! What a big difference does that make! Since I’ve painted her white, every bit of sawdust, little pieces of wood, tape, screws, or anything else is visible. I’ve never spend more time cleaning up the boat since now.
So white is the new color of a clean solution!
.JPEG/picture-200?_=1864ac47350)
29-01-2023 Last fiberglass for now...
Yippeeeeee the last fiberglass work is almost done... The cockpit is glassed and now I might have to do some repairs if air is catched under the fiber, but the big job is done! That makes me HAPPY!!!!!
I applied 600gr/m2 on the entire cockpit and an extra band of 350 gr/m2 (10cm width) on the seams. Now the next fase with filler and sanding can start!
15-01-2023 New Year, new fase!!!
After the christmasdays with lots of visits, nice diners, relaxing and santa stopping for some presents, is was 'BM time'. Time to lock myself in the garage and continue building the most beautiful litlle boat there is! Building the BiggestMonkey (BM time).
After a complete week of sanding, epoxy, fibers and paint the building of the little boat entereda new fase! I can start with filler, sanding and painting again. But this time without big adjustments to be made!
Now I have to start with the interieur specifications and the electrical system. Pumps, batteries, wiring, devices, comfort and everything else needed on board. A new fase of spending serieus money! But for now: happy new year and all the best in 2023
19-12-2022 Sailing or Skating...
Sailing or skating, that was the question!
Although skating on the lakes in The Netherlands is a part of the Dutch culture, I stayed warm in my shed and focused on sailing (in the future😉)
This weekend I started to put on the deck! What a milestone! First a double check, triple check and a fourth check if I finished all the bigger parts and all the jobs I only could do without the deck on. I hope a fifth check wasn’t necessary🙃
To be honest, after screwing and gluing the deck on, I sat inside the boat and was happy, relieved and a bit scared at the same time. Pooh, what a small space,,,,😉😃
I also made a mock-up with the windvane, ladder and the transom daggerboards. The question rises on which position and angle I should place the daggerboards. Every suggestion is welcome!
04-12-2022 Big steps forward this weekend!
This weekend I've made great progress!!!
14-11-2022 The mikado starts to become a boat...
Last two weekends I've made good progress! What started with a lot of mikado, slowly becomes a boat. Step by step the inside of the boat gets a cosy feeling. The navigation table is almost ready to install. I’ve made two storingplaces without doors. I’ll install elastics to keep everything inside instead of a door. That will make it easier to put stuff inside. The top of the table can be lifted so I can store maps and all kinds of small different things.
The bunks have lockers with big openings so I will be able to put in larger things. The lockers can be secured so in a breach not everything will be all over the boat.
The battery compartment I’ve made watertight. I will install small tubes front to aft of the boat to all the points I need electricity. That will make the electrical system as waterthight as possible.
https://strato-editor.com/.cm4all/widgetres.php/com.cm4all.wdn.PhotoGallery/images/thumbnail-gallery.png
If the boats start flooding, the first steps to get it dry have been made. I found handpumps with an integrated handle. Easy to use and with a large capacity. One handpump inside and one outside as required. The points the hose go through the watertight compartments, will be sealed with a rubber seal.
2-10-2022 I can sit :-)
The first steps of building the interior started with the bunks and the galley. It feels great to sit in the boat. Now I start to get a feeling of the inside dimensions... Pffff that's cosy... Or rather small. But hey, it is only 30 days to the other side so I'll be fine.
We filled the crashbox with foam and decided to make a 'floor' from the crashbox to frame D so we can make some storage underneath. Directly in front of frame D, we will put the batteries so that will be an extra watertight compartment.
The bunks and the galley will be rather simple and standard. No difficult lockers, only two waterthight compartmens in de back of the bunks to store clothing.
also started to put in the stringers for the cockpit. That is starting to look more like a real cockpit!
16-09-2022 Everything upside down
Yeah! Many hands make everything possible!!! With the help of a lot of good friends we've turned everything upside down.
.JPEG/picture-200?_=1837895fc98)
Before the boat could be turned around, I've first made some moulds to put the boat stable on her feet when I started with the inside of the boat. I put on some plastics and used the fiber left overs. Not the most pretty endresult but functional. I positioned the moulds on the position of the frames to be able to spread the load of the boat evenly.
And then.... a great exertion of force by good freinds made it possible to witness her in the upright position.
First we weeled her out, that was easy. After positioning all the matrasses to give her a smooth landing, we started to tumble her around. We had to remove the skeg otherwise it would have crused the hull probably. With joint effort the last 90 degrees was lifted and the trolleys placed. Although it started to rain, everybody was smiling when she re entered the garage. Might be possible that the waiting bottles of champagne created the smiles on everybodies faces...
But above all, I'm very happy to be able to start a new fase!
26-08-2022 The first layers of paint
Yes!!! We finally decided that the boat is smooth enough to start painting, so we've put on the waterline with a laser and started painting!
First 3 layers off HighBuild epoxy primer on the bottom. I raised the waterline with 6 centimeters. To make sure there is no 'edge' on the paint, I painted the first layer 6 cm higher, the second 7 cm, and the thirth 8 cm. When I put on the DD paint on the sides, there is no 'edge' between the primer and the DD but a fluent thickness difference.
After the Primer I put on the DD lak. 3 layers. The first layer I put in 10% thinner to make it fill up the epoxy filler. The second and thirth layer without any thinner. The results are great!
16-08-2022 Filling, sanding, filler, sandpaper, dustprotection, filling, sanding, filling, sanding.......
Hours and hours and hours....
In the last weeks, I've been trying to motivate myself to create the perfect, smooth and beautifull hull... After removing the peelply (best choice! always use peelply! It is an extra investment, but pays back in labour, sandpaper and filler!), the hull is ready to prepared for the next step "Painting".
Before the paintjob can start, you have to use a lot of filler and sandpaper to create that beautifull skin.
After applying seven layers of filling and sanding almost all the filler off again, I've made a decision.
At the risk of offending female readers; I have to admit that a lady always has a stronger will than a man...'ladies win'
The boat is a real lady! She is beautifull, she has her own will and you can not change her if she doesn't want to...
If I apply more 'make-up', she gets ugly... So: she is beautifull as she is right now and as beautifull as she will ever
be :-)
Either way, she is becoming beautifull!!!
Some advices:
- do not apply to much filler each time, mix small volumes of 150-200 gr epoxy filler. If you use more, it will dry out to fast...
- buy the sander as shown on the photo! it is a great machine!!! (Ingersoll Rand 315G Edge Series Straight Line Air Sander, Black, Large) (Thanks to Derek Kozlowski)
- crossing the ocean takes a lot of time too... so a couple of days sanding is a good exercise for your patience...
12-08-2022 All the 'juwelry" has arrived
End of june I ordered all the stainless steel parts by Piotr Carniezki, who also made all these parts for some other GC580 boats. He kept me updated about his progress of constructing, welding and polishing all the parts and I was very excited to hear the packages was send from his workshop in Poland to the Netherlands. But than the packages was lost in a large storage location in Poland... After a couple of mails, calls and messages I got news that the package was supposed to arrive somewhere end of august...
The gift arrived totally unexpected on last Tuesday morning, 2 weeks earlier. We were on our way to EuroDisney in Paris with our three daughters when the (digital, IP connected) doorbell rang. The delivery guy, with a large truck had a pallet ready to hand over. Luckely we were able to establish a two-way connection with our doorbell and I was able to aske the delivery guy to put the packages on our driveway. The DHL guy was very helpfull and manouvred the package on a logical place on the drive way and closed the gate so the package could not been seen from the road. What a guy!!
Four days later, after a great stay in the centre of Paris, we arrived at home and it really felt like christmas when we finally were able to unpack a large black gift on the drive way.
What a great job did Piotr! And although the delay in delivery, it felt like a early present!
26-06-2022 Fiberglass, Fiberglass and peelply
It was a small step in the buildingproces, but a gaint leap for myself.... I was not looking forward to this task! I was afraid that the fiber would be very difficult to put on, the epoxy would be stiff to fast and it would take all day.
None of it was true!!! We've made a great result. With the help of good friends Bas, Marc, Adriaan and my father, we started at 8.30 in the morning. It was great weather to use epoxy with a temperature of 20 degrees celsius. Everything was ready to start, a scale, lots of small plastic buckets, paint trays and rollers, good siccors, a stirring sticks, aceton, cleaning cloth, lots of coffee, good music and a big smile!
We started at the stern. It was the most difficult part to start. After the first layer of 600gr/m2 biaxial fiberglass, we put on the second and worked our way forward to the bow. We had a scaffold over the boat to be able to put on the fiberglass, without it, it wouldn't be possible without epoxy all over you...
We put on the layers of glass in the transverse direction of the boat except the last 2 meters from the bow. When you put on enough resin on the first layer it is easier to bring on the second and get it fully infused with epoxy.
After the layers of fiberglass a layer of peelply was added! It is an investment, but the investment will pay back as soon as you start with the filler and the paint job!!!
After 4,5 hours of work the complete hull was ready!
26-06-2022 making the bulb
At first I tried to made a mould for the bulb with wood, but it took me a lot of time and it was not very easy. After some great blogs and some advice of a friend, I bought some PU foam and made a mould with foam and 3mm thick multiplex on the correct sizes.
.JPEG/picture-200?_=181a1688ea8)
.JPEG/picture-200?_=181a1687f08)
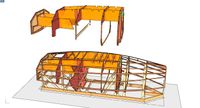
06-06-2022 Next step... laminating the hull is started
After doing nothing for a long time, I finally started again! It feels GREAT!!! To be honest, I was postponing the start because I'm wary of the laminating process. Fiberglass is not my favorite material, although I'm working with fibers every day (Fiber to the Home in the telecom sector)
Before the laminating could start, I first had to round off al the corners. Fiberglass cannot bend in a right angle! So after sanding all the plates with sharp edges, everything was rounded. It made the boat look beautifull!!!
Also all the little holes of the screws had to be filled with epoxyfiller. After that I injected the wood with epoxy, so not all the epoxy needed to laminate will be sucked in. After a last sanding, I started the strengthening of the joints.
I used 250gr/m2 and 450 gr/m2 bi-axial woven glass fiber. For the joints in need of 600gr/m2 I used 1 layer of 250 and 1 of 450, for the double strengthed joints, 3 layers of 250 and 1 of 450. I used PolyPox500 universal epoxy. To make a nice finish I used peel-ply.
11-04-2022 Another moment of champagne was there!!! The hull is closed
This weekend we reached the point that we can call it a boat. Of course not yet complete and finished, but if we put it in the water, it will float!!! And as stated before: every opportunity to celebrate should be taken! Champagne!
It was quite a lot of work to attach the hull plates to the stringers. Especially the two on the nose of the boat. There is quite a lot of tension to be put on, but with a few clamps and a pair of extra hands, we've made it.
_LI.jpg/picture-200?_=18017ae43c8)
We started on the bottom (we are building upside down, so actually on the top) and worked our way up. The three plates were easy to place and after putting on epoxy we screwed them on the stringers with a lot of stainless steel screws. We planed the second and thirth plate (nr1 = nose, nr3= stern) to fit the middle plate. The plate on the nose we did not plane because the angle of the two plates is just a bit, so we planed the plate we attached later just a bit.
Advice to every builder is to dry fit everything before putting epoxy on al the parts. We also draw lines on the outside to be able to put the screws in on the right locations. Also put a stop on the stem to avoid the plates to move forward during screwing it on the stringers.
180 hours of work till now!
20-03-2022 Not floating, but on its way!!!
.JPEG/picture-200?_=17faba66a50)
Not yet waterproof, but the first steps have been set! The skeleton of a whale is transforming to a boat.
Far from watertight, it will sink instantly if we put it into the water but big steps are made!
Last week all stringers are planed into shape. By adjusting the planer we were able to determine the angles on the stringers.
.JPEG/picture-200?_=17faba67137)
To prepare the paintwork inside, all hull plates are impregnated with epoxy on the inside. Luckily the weather was nice, so a could sand the plates outside in the sun 😊
After preparing the stringers and the hull plates, we dryfitted the plates. Great to see the progress! A few final adjustments later, we screwed the hull plates first. Couple of hundred screws later and sure everything fitted, everything was unscrewed and glued with epoxy.
Great to see the epoxy squeezed out and being sure we’ve used enough, but it takes al lot of flexibility to crawl through all the frames and stringers for a neat finishing of all the epoxy.
Next week we will continue to place the other hull plates.
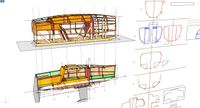
06-03-2022 NO, it is not a whale, it is becomming a boat :-)
Rapidly the pile of wood is becomming a boat! No, it is not a whale, it is a little boat with frames and stringers!
Last week and weekend, we've made a lot of progress. We started beveling the frames to be able to attach the stringers to the frames.
It took a lot of hours to bevel the frames in the correct corner. Thanks to Pim vd Brink van Kolibri Jachtbouw I could use a simple tool to measure the depth of the frame. You can see it on the photo. It is simply to measure the crosspoint of the two sides of the frame.
To bend the stringers aroud the frames I've used clamps at the end of the stringer. You can use the clamp to twist the wood. Overnight I've made the wood wet and step by step it was easier to get the wood into place.
Till now we've spend 120 hours of work.
20-02-2022 CHAMPAGNE!
This week(end) we've made a lot of progress! After days of sanding, using epoxy and putting parts together, the jigsaw is slowly looking as a boat. Okay, it is a boat upside down and is it is far from floating, but with the imagination of a child (or a builder) it starts to be a boat!!!
And as stated before: every great moment has to be celibrated!!!! so: CHAMPAGNE!!!!
In The Netherlands, probably in the rest of the world as well, the laying of the keel is a special moment. I know, the 5.80 doesn't have a keel, but we've found the bunk sides and frame D1 and B together is the base of the boat and therefore the keel! When we've layed the keel, it was time to celebrate so another bottle had to be opened!!
For everybody who wants to know how much it is to build a 5.80, I'll state a price with champagne inclusive :-)
To be able to line out the frames, we first put the lines of the vertical supports on the frames (1148 mm) That makes it easier to position the frames to the vertical supports of the jig. After putting on the lines, we've measured the hight of the frames from the top to the point of the lowest part of the frame resting on the vertical support. This makes it possible to position a support (a little wooden block) on the vertical supports of the jig. On these wooden blocks, we've rested the frames and used screws to connect the jig and the frames. Also a simple laser with a vertical and horizontal laserbeam is very supportive to make sure you build a boat which goes in a straight direction...;-)
.JPG/picture-200?_=17f189fb490)
13-02-2022
All the frames are ready!!! After epoxy and stainless steel screws (A4) alse impregnated all componants. Only a little bit of sanding and everything is ready to be installed on the jig. I chose to impregnate with epoxy so I don't have to paint a base layer. More important is to be able to reach every corner of the frames. After installing it will be difficult to make the frames and the hull completly watertight. Lots of work during preparation fase, but easier in the end. Start slow to go fast :-)
Preparing the keel timbers. Be carefull, the stringers are fitted in an angle, but preparing the keel is possible without installing it.
09-02-2022
The week is halfway! doesn't mean we are halfway done of course! but we are very proud about the steps we've made so far! Frame, A, C, and the transom are ready! Tomorrow we start with frame B. Later this week we have a difficult frame to make. The difficult frame is Frame S, the entrance of the cockpit.
I don't want the cockpit or a dome on the deck. The cockpit gives you a better view from inside the boat while sailing. Especially when you have to do a quick peek outside is easier to look through a window instead of going outside. Imagine rough weather, waves and water hitting the deck... How comfortable is it to be able to look outside, warm and cosy? But..... the cockpit also doesn't make the design pretty. Besides that the cockpit is a huge obstacle if you need to go to the bow. Not that we need to go to the bow very often, but if you have to... it is lots easier. All together I've decided to cancel the cockpit... :-)
That means that we have to adjust frame S! In my next update, I'll show you the adjustments :-)
Here the photo's of frame A, C and the Transom
06-02-2022
This weekend a lo of work is done! Frame E and D are glued together! Frame D1, C, B, A an d the transom are ready to be glued next week! First steps are made!!!
27-01-2022
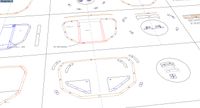
Finally the CNC timber kit has arrived! The real first step to start building!!! The truck driver was pretty early at 7.00 in the morning. He delivered it directly into my garage!
Later that evening we've unpacked the 25 timber plates. Quite a lot of wood, but beautifully cnc cut! Tried to sort it out directly and placed the parts to build the deck on the loft of the garage.
Later that evening we celebrated with champagne!